Swarm Bunker Lust Defense How Turrets Work
Automated defenses, upgrade paths, and answers to the Steam question: what are turrets supposed to do?
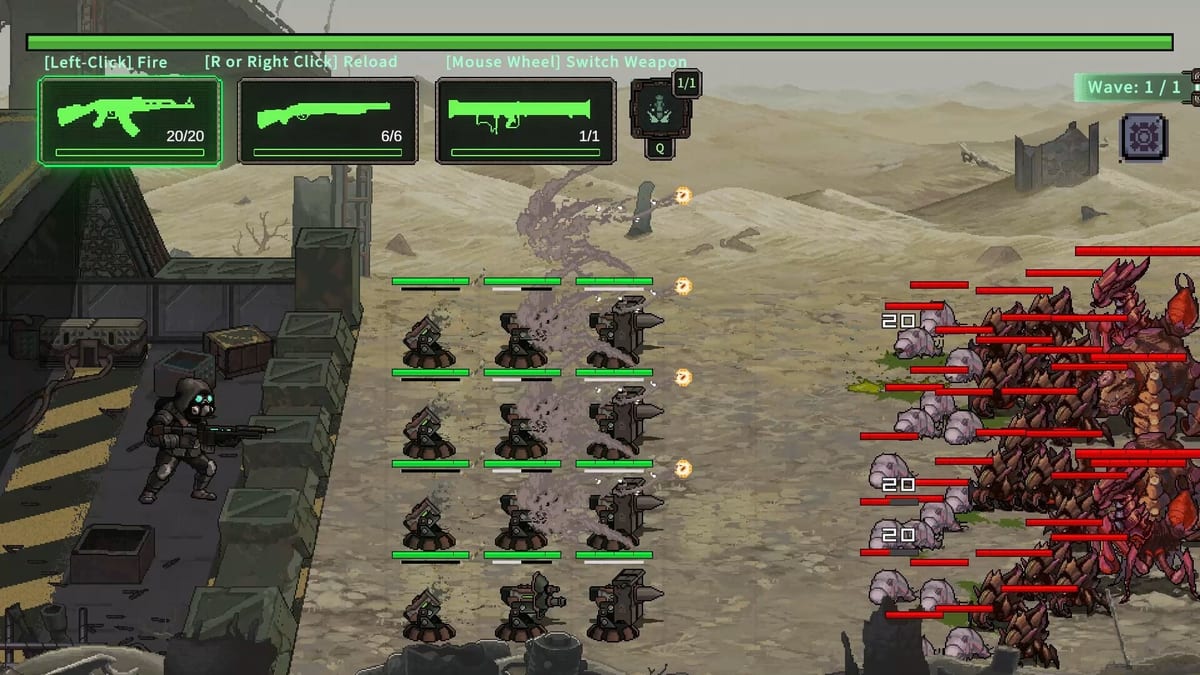
Automated turrets are the passive DPS layer in Swarm Bunker: Lust Defense—the August 2026 Steam tower-defense shooter by 001Studio-NSFW. While you aim machine guns, rockets, and shotguns from the fixed bunker, turrets fire on their own, covering lanes you cannot watch simultaneously. Nora, the lazy scientist heroine, builds and upgrades these systems; her bond line adds stronger turret modules and combat perks. Demo V3 explicitly added new turret mechanics, which triggered Steam threads asking what turrets are supposed to do—this guide answers that with practical setup advice.
What turrets do in combat
Turrets are not decorative base props. During defense stages they:
- Shoot nearest valid targets in their arc without manual input.
- Apply steady damage that compensates while you reload or swap weapons.
- Hold secondary lanes so you can focus aim on armored threats in the primary lane.
- Scale with upgrades purchased at base using stage rewards and Nora-related progression.
They do not replace artillery—artillery is a player-triggered burst for spikes. They also do not replace shotgun duty when enemies breach melee range; turrets may fail to kill jumpers fast enough without anti-air or damage upgrades.
Turrets versus your three firearms
Think of overlapping roles:
| Layer | Role | Player input |
|---|---|---|
| Machine gun | Flexible sustained DPS | Constant |
| Rockets | Armored burst | Manual |
| Shotgun | Leak cleanup | Reactive |
| Turrets | Passive lane control | Placement + upgrades only |
| Artillery | Spike delete | Cooldown management |
When turrets feel useless, the problem is usually placement on an empty lane, under-upgraded damage, or expecting them to kill armored elites alone—switch to rockets for those targets and let turrets shred fodder. Rankings by upgrade tier are on the Turrets Tier List.
Unlock and upgrade path
Turrets enter early tutorial stages with a single deploy slot. At base between missions you spend scrap on:
- Damage upgrades — highest priority per Best Build.
- Additional coverage modules — second arc or wider angle when Nora’s story flags unlock them.
- Specialized behaviors — demo V3 revisions added clearer targeting; full release may expand types—watch Updates for patch notes.
Bond growth with Nora accelerates access to stronger turret tiers and exclusive combat abilities tied to automated fire. Read Bond System and Unlock Bond & Scenes so you trigger her story events before buying redundant weapon upgrades.
Targeting behavior players asked about on Steam
The demo discussion What are turrets supposed to do? usually came from players who deployed once and never upgraded. Observed behavior:
- Turrets prioritize enemies inside their firing arc, typically nearest-first.
- If two lanes spawn simultaneously, a single basic turret may lock the wrong lane—place it to cover the lane you cannot aim at, not duplicate your crosshair.
- Jumping or fast units can exit arc before kill—pair with shotgun or reposition via upgraded arc modules.
- Armored units need rocket support; turrets tick them down slowly unless damage tier is high.
There is no manual target ping in base descriptions—success is positioning and upgrades, not micro-management.
Recommended setups by stage band
Stages 1–3: One turret on the off-lane; upgrade damage once before buying rocket tiers.
Stages 4–6: Ensure both lanes have passive coverage before stage 5 density spike. Sync artillery with turret focus fire on armored clusters—see Walkthrough stage 5 notes.
Stages 7–9: Max turret damage relevant to your economy before attempting stage 9. Use Upgrade Checklist turret rows. Shotgun remains mandatory for leaks turrets miss.
Post-demo main release: Treat new chapters as turret DPS checks first, personal weapon flair second.
Pairing turrets with artillery and Lina
Lina handles artillery and heavy ordnance fantasy—scrap metal turns into loud solutions. Artillery clears spikes; turrets maintain baseline pressure. Call artillery when turrets are locked on fodder but armored stacks arrive—do not expect turrets to finish elites under time pressure. Lina bond perks that buff explosive damage indirectly help your manual rockets more than turret tick damage; plan resources accordingly using the Tier List Hub.
Common mistakes
- Deploying turrets on the lane you already aim at — wastes overlap; cover blind spots.
- Skipping Nora base events — delays stronger modules.
- Zero turret upgrades with maxed machine gun — fodder dies fast but armored waves overwhelm.
- Ignoring shotgun because turrets exist — jumpers still leak.
Related pages
| Topic | Link |
|---|---|
| First-time loop | How to Play |
| Stage specifics | Walkthrough |
| Spend order | Best Build |
| Weapon rankings | Weapons Tier List |
| Nora biography | Nora |
| All guides | Guides Hub |
For control issues deploying abilities on Steam Deck, see Controls & Steam Deck. For honest game context, see Review.
Frequently Asked Questions
Quick answers to the most common questions.
What are turrets supposed to do?
Provide automated damage in assigned arcs while you use manual weapons. They hold lanes and kill fodder—not replace rockets, shotgun, or artillery.
Who upgrades turrets in the story?
Nora, the scientist heroine, ties into turret inventions and bond perks. Visit her base events and upgrade at the armory between stages.
Should I upgrade turrets or weapons first?
Early damage upgrades on turrets usually beat a second weapon luxury tier. Follow Best Build and the Upgrade Checklist for exact order.
Why do enemies leak past turrets?
Fast or jumping units, wrong arc placement, or low damage tier. Fix with positioning, Nora upgrades, and reactive shotgun swaps.
Did turrets change in the demo?
Demo V3 added new turret mechanics per public notes. Full release continues Nora's line—check Updates for post-launch changes.